Straight to the Point Recipes and Cooking Tips

August 17, 2022

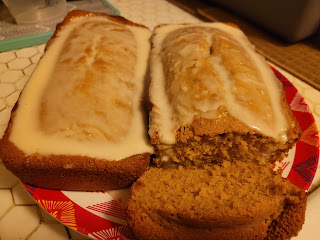
Sweet Potato Bread - Sweet Potato Muffins

by , in


Ingredients 

  • 1 cup of white sugar 
  • ½ cup of brown sugar 
  • ½ cup of butter (1 stick) 
  • 2 eggs 
  • ½ -¾ cup of mashed sweet potatoes 
  • 2 cups of all-purpose flour 
  • 1 teaspoon of baking powder 
  • ½ teaspoon of baking soda 
  • Pinch of salt 
  • 1/3-½  cup of milk 
  • Roughly 1 teaspoon of cinnamon 
  • Roughly 1 teaspoon of nutmeg 
  • 1 teaspoon vanilla extract 
  • Optional: 1/3 cup of vanilla Greek yogurt or sour cream 


Directions 

  1. Preheat oven to 350 degrees F. Prepare either loaf pan or muffin pan by spraying with nonstick spray or with butter and flour to prevent bread from sticking. 
  2. Peel sweet potatoes and cut into chunks. Place cut sweet potatoes in an even layer into a pot and add just enough water to cover the potatoes. Boil until soft. Once soft, remove from heat, drain, mash, and allow to cool. 
  3. Combine white sugar, brown sugar, and melted butter.
  4. Add eggs to sugar and butter mixture. Mix well. 
  5. In a separate bowl, combine flour, baking soda, baking powder, salt, cinnamon, and nutmeg. 
  6. Add the flour mixture and milk to the egg mixture, alternating between the flour and the milk  
  7. Add cooled mashed sweet potatoes to the batter 
  8. Add vanilla extract 
  9. Pour batter into baking dish of choice and bake for 40-50 minutes or until check with a toothpick and the toothpick comes out clean.
  10. Remove from oven and allow the bread to cool in the pan for at least 10 minutes before removing.
  11. After 10 minutes, remove from pan.
  12. Serve and enjoy.
August 17, 2022

Baking Tip: How to Tell if a Cake or Bread is Finished Baking

by , in


Tips: How to check a cake or bread for doneness.

There are a few ways to check a cake or bread to see if it is finished baking. The most common and certain way is to use a long toothpick, skewer, or butter knife. You stick the skewer near the middle of the cake or bread and remove it. If the skewer has raw batter on it, then the cake needs to bake a little longer. If the skewer is clean or has a few cooked crumbs on it, the dish is done.

Another way to check if a cake is done is to gently give the baking dish a little shake. Most cakes and breads become firm when they are fully cooked. If you notice the center still looks wet and jiggles, then the cake needs more time to bake. I don't recommend doing this until the cake or bread has been baking at least three-quarters of the time suggested in the recipe. For example, if I'm following a recipe that suggests I bake a cake for 60 minutes, I would start checking the cake around 45-50 minutes. The reason for this is that every oven is different, so cook times vary. If I bake banana bread in my toaster oven, which is larger than most toaster ovens, but smaller than a traditional oven, I'd have to adjust both my cooking time and temperature to get desirable results. 

For the really brave and experienced, you can gently touch the top of the cake or bread near the center with your clean hand. If it jiggles or if you get a little batter on your fingertip, the cake needs more time to bake.

There are obvious visual cues to indicate doneness, like a burnt crust. If the sides of the cake or bread begin to pull away from the pan while it is still in the oven, then it is probably done and most likely overcooked. 

With time and practice, you can eventually be able to just look at the cake and smell it to be able to tell when it is finished baking. Personally, I use a combination of visual cues and a butter knife or toothpick to check my cakes and breads. 

I hope you find these tips helpful!
April 15, 2022

Creamy Grits

by , in

Cheese grits with beef bacon

For me, grits can be hit or miss. Everybody makes them differently, some people opt for sweet grits and others prefer savory. I'm on team savory. Some people say that there is no such thing as "quick grits" I disagree. I find that most people tend to have grits that are a little watery for my tastes. Some people use water, some use milk and some use chicken broth.


You can always follow the instructions that might come on the package, but I like my way better. Adding the grits to the water and milk immediately instead of waiting for the water the boil makes a difference in taste and consistency. Here is my take on quick grits that come out creamy and delicious. 


This recipe makes one serving. To make more, for every 1/3 cup of grits, use 1 cup of liquid. For instance, if you want to prepare 3 servings of grits, use 1 cup of grits and 3 cups of liquid (water, milk, or broth.) 


Ingredients 

  • 1/3 cup (4 tablespoons) of grits 
  • ½ cup of evaporated milk (or regular milk) 
  • ½ cup of water 

Optional 

  • Salt to taste 
  • Butter to taste 
  • Cheese to taste (I either use a Mexican blend or a 3 Cheddar blend of shredded cheese)


Directions

  • Add grits, milk, and water to a small pot over medium-high heat and bring to a boil. Allow grits to boil for 2-3 minutes. 
  • Stir, reduce heat to very low, and cover the pot with a lid.  
  • Allow grits to simmer for 5-7 minutes, stirring occasionally. 
  • Add seasonings to taste 


March 24, 2022

Sour Cream Pound Cake

by , in


This post contains affiliate links. If you choose to purchase a product using the links I've provided I may receive a small commission. This helps to support the blog at no cost to you.


 Ingredients 

  • 3 cups of flour 
  • 2 ½ cups of granulated sugar 
  • 1 teaspoon baking powder 
  • ¼ teaspoon of salt 
  • 3 sticks of unsalted butter (room temperature) 
  • 5 eggs (room temperature) 
  • 8oz sour cream (room temperature)
  • 2 teaspoons of vanilla extract 
Optional:
  • 1 teaspoon of butter extract 

Directions

  1. Preheat oven to 325° F
  2. Prepare baking dish (I used a 12 cup bundt pan) by either greasing with butter and dusting with flour OR using a baking spray such as Baker's Joy or Pam Happy Baking.
  3. Using either an electric stand mixer or hand mixer (this can be done manually without an electric mixer though it will be more work) cream together butter and sugar until light and fluffy. Remember to scrape the sides of the mixing bowl. If using an electric mixer, use the low to medium speed setting.
  4. Mix in extracts
  5. Carefully mix in the eggs one at a time until fully combined
  6. In a separate bowl, combine the flour, baking powder, and salt
  7. Beginning with the dry ingredients (flour, baking powder, salt), alternate adding the dry ingredients and the sour cream in small portions. Remember to scrape down the sides of the mixing bowl every so often. Mix the batter until just combined. If you overmix the batter, you risk compromising the texture of the cake.
  8. Pour the batter into the greased baking dish. Give the baking dish a few pats on the bottom and a gentle shake in order to release any air pockets that may have formed
  9. Place in the oven and bake for 70-90 minutes depending on your oven and altitude. Try not to open the oven until the cake has been baking for at least one hour and five minutes. 
  10. Once the cake has finished baking, poke the cake with a clean toothpick for doneness. If there is batter on the toothpick when you remove it, the cake needs to bake a little longer. If there is no batter on the toothpick, the cake is done. I have also used a clean butter knife to accomplish this. TIP: You can also give the pan a little shake to see if the cake jiggles. Pound cakes are usually dense, so if it is fully cooked, then it will not jiggle. 
  11. Remove from oven and allow to cool for at least 20 minutes before attempting to remove from the pan. 


Notes

This is a great snacking cake. The crust is nice and has a good crunch, while the inside is very soft. I chose not to add any glaze or frosting to this cake, but it pairs well with almost any flavor glaze, whipped cream, or fruit. You can also have it plain with a cup of tea or coffee to drink with it. 


Most pound cake recipes require a lot of sugar, sometimes 3 cups. This one uses 2 1/2 cups. I do not recommend reducing the amount of sugar because based on personal experience, reducing the amount of sugar changes the chemistry of this recipe. The cake will become too dense, heavy, and dry. I have not attempted this with a sugar substitute, so I don't know how it would turn out. However, if you'd like to use less sugar and keep all the ingredients the same, I'd recommend adding an extra egg and perhaps another stick of butter to make up for the sugar. 


March 15, 2022

Brown Sugar Pound Cake Loaf

by , in


Ingredients

  • 1 1/2 cup packed dark brown sugar 
  • 2 cups flour 
  • 1/2 teaspoon butter extract 
  • 1 teaspoon vanilla extract  
  • 1 teaspoon baking powder 
  • 1 cup evaporated milk 
  • 2 sticks (1 cup) room temperature butter 
  • 4 room temperature eggs 
Directions

  1. Preheat oven to 325°F
  2. Using either an electric hand-mixer or stand-mixer, cream butter and sugar together. This can be done manually if no electric mixer is available, though it will take longer.
  3. Add eggs to the butter and sugar mixture, 1 at a time 
  4. Add extracts 
  5. Combine flour and baking powder in a separate bowl 
  6. Alternate adding flour mixture and milk  
  7. Prepare a baking dish with either baking spray or butter and flour. This cake can be baked in the oven-safe dish of your choice. I used two 8"x4" metal loaf pans for my cakes.

Vanilla Glaze
  • 1 1/2 cups of confectioner's sugar
  • 1-2 tablespoons evaporated milk (or regular milk)
  • 1 teaspoon of vanilla extract


July 17, 2020

Lemon Icebox Pie

by , in


Technically, this could be considered a no-bake cheesecake, but I'm calling it a lemon icebox pie.

Ingredients
  • 1 pre-made graham cracker or shortbread cookie pie crust
  • 8oz cream cheese at room temperature
  • 14oz sweetened condensed milk
  • 1/4-1/2 cup of lemon juice
  • Lemon zest for extra flavor (optional)
Instructions
This filling can be mixed by hand using a spoon or whisk, but it will be easier to mix it using either an electric hand mixer or a stand mixer. 

  1. In a large bowl, combine the condensed milk and lemon juice.
  2. Add softened room-temperature cream cheese to mixture.
  3. Mix until smooth.
  4. Remove lid from pie crust.
  5. Add filling to pie crust.
  6. Cover pie and refrigerate for a minimum of 4 hours.
  7. Serve.

Like what you read? Check out my other ventures & stay connected:

Main hub - https://linktr.ee/letarawrites

Poetry, Book Reviews, Essays - Life in a Few Words - https://letarawrites.wordpress.com

Tarot & Spirituality - Sparkle Noir Tarot - https://sparklenoirtarot.blogspot.com


July 08, 2020

Easy No-Knead Biscuits - Butter Swim Biscuits

by , in


I got this recipe from Divas Can Cook. Here is the original video for this recipe. What I am listing on this page is how I made the recipe using the ingredients that I had. I've tried some of the other recipes on the Divas Can Cook channel and have enjoyed them all so far. Now, on to the recipe!

Ingredients

• 2 ½ cups all-purpose flour
• 4 teaspoons baking powder
• 2 teaspoons salt
• 2 tablespoons granulated sugar
• 1½-1¾ cup buttermilk cold
• 12 tablespoons unsalted butter divided (If all you have is salted butter or margarine, DO NOT add additional salt. Ignore the 2 teaspoons of salt listed above)

Note: Make sure the butter and the buttermilk are cold before preparing this dish. Also, you may notice in many of my photos that I line my baking dishes with foil or parchment paper. This is for easy clean up and convenience, especially when I am borrowing dishes. The dish I used was not an 8x8.

Instructions
  • Preheat oven to 450 F.
  • If you prefer, line your baking dish with foil or parchment paper.
  • In a large bowl, whisk together flour, baking powder, salt and sugar.
  • Cut in 4 tablespoons of cold butter until mixture is crumbly.
  • Slowly add in buttermilk, a little at a time, JUST until a wet dough forms. (may need to use slightly more or less buttermilk as stated) Set aside.
  • Melt 7 tablespoons of butter and pour it into a 8x8 glass baking dish.
  • Spoon the biscuit dough on top of the butter and gently spread it out.
  • Precut the dough into 9 squares. (this will allow the butter to get to all corners of each biscuit)
  • Bake for 18-20 minutes or until golden. (If the tops are still pale when almost done, flip the oven to broil to add some golden color to the tops but watch it carefully!)
  • Remove from oven and allow the butter to absorb into the biscuits.
  • Brush the tops of the biscuits with remaining tablespoon of butter.

Like what you read? Check out my other ventures & stay connected:

Main hub - https://linktr.ee/letarawrites

Poetry, Book Reviews, Essays - Life in a Few Words - https://letarawrites.wordpress.com

Tarot & Spirituality - Sparkle Noir Tarot - https://sparklenoirtarot.blogspot.com